If you have an upcoming live shopping session or virtual event, you definitely need to find out how to add products with images and links. Even if it’s quite intuitive, we’ve decided to share with you this step-by-step guide on how to do that.
STEP 1:
Once you are logged into your Streams.live account, click on the blue ‘SETUP’ button.

STEP 2:
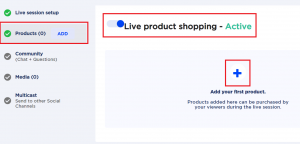
Once you select the ‘Products’ step, make sure that the ‘Live product shopping’ is active. To add your first product, click on the ‘+’ sign.

STEP 3:
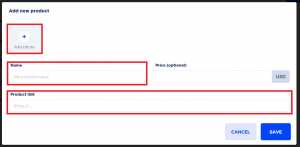
To add your product image, simply press in the middle of the square, on the ‘+’ sign, above where it says ‘Add photo’. Afterward, you will be able to upload an image from your device’s memory.
To edit your product’s name, begin to type in the box where it’s written ‘My product name’.
For each added product, you have the option to insert a link. That’s where your viewers will be redirected after they press the ‘BUY NOW’ button during a live shopping session. Simply copy and paste that link, which might redirect them to your website’s checkout page or anywhere you feel like it’s relevant.

And that’s how you can add products with images and links on Streams.live. Quite easy, isn’t it? If you get stuck during the process, don’t hesitate to reach back to us through our live support channels. We are always ready to guide you through our platform!


